Fish Themed Lunch

Fish Themed Lunch

In an effort to get my oldest son to eat something other than chicken nuggets for lunch, I decided to take a stab at putting together a themed lunch.  So, today I served “jellyfish” (hot dogs with pasta tentacles), “starfish” (cheese cut into star shapes), goldfish crackers and clam shells (clementine slices).  My youngest son thought it was hilarious and enjoyed every moment and bite of it.  My older son wound up eating “crab nuggets” - mickey mouse head shaped chicken nuggets turned upside down.  He did, however, enjoy his fish eggs (grapes), goldfish and squid ink (ketchup).  Even though he still ate chicken nuggets today, I think he really enjoyed this.  I know there are some crazy parents out there that do these very elaborate art-like lunches.  I’m about to surf the web for my next exciting lunch idea and hope that the next idea will be so great (and chicken nugget free) that he won’t even notice the missing nuggets.

  • Bookmark on Facebook
  • Digg This
  • Bookmark with Yahoo
  • Bookmark with Google
  • Email to a Friend
  • Print

Teacher Appreciation Gifts

After having given CheezWaster’s nursery school teachers Dunkin Donut gift cards for Christmas, I wanted to do something a little more crafty and from the heart for Teacher Appreciation Week.  I also wanted it to be either consumable or something I knew the teachers would use.  I poked around the internet and found some really cute teacher themed chocolate molds on candy.com that were well worth the investment considering I can use them for years to come.

Chocolate Paint Palette

Since the one mold I was working with had text as part of the design, I chose to paint that with colored chocolate to make it stand out.   I filled my Chocolate Paint Palette (which I found in the food making section of AC Moore) with colored chocolate wafers, melted them at half power in the microwave and began the painting.

Painting the Design with Colored Chocolate

Finishing the Design Painting

As you can see in the picture above, when you are adding a fill to the design, you will need to tap the mold to make it even.  If you don’t do this, you are liable to have bubbles in your chocolate after it sets.  This picture shows and untapped mold.

Melting Chocolate

Next, I melted regular chocolate wafers to fill in the main portion of the chocolate mold.  I like this type of wafer better than the chocolate version of the colored wafers.  It is smaller and melts faster.  It is also designed to use with fondue pots and chocolate fountains and I find the taste to be more authentic.  I melted these directly into a plastic bottle made for chocolate making (also found at AC Moore).

Filling in the full shape

 I filled the molds almost to the top.  These were very large in diameter and didn’t necessarily need to filled to the top.  There was definitely plenty of chocolate in them even though they weren’t full.  However, when making all other mold chocolates, make sure you fill the mold full.

The finished chocolate

 This was the finished chocolate after I put it in the freezer for a few minutes to set.  The text reads “The Best Teachers Get Chocolate”.

Other Colored Chocolate Designs

We also made some chocolate rulers, apples, crayons & books.  I packed them all in white food boxes that I purchased around Christmas time at the Container Store.  You could also just add these to a cellophane bag, a chocolate box (found at AC Moore) or any type of fancy food storage container.

This entire project cost me about $35, but I’ve got plenty of left over chocolate wafers that I’ll be able to use for other projects.  And I’ll certainly be able to use the molds as the kids go through each grade of school.  All in all, I found it to be a fun and reasonably priced gift.  And if you didn’t want to lay out all of the cash for the various colors of chocolate, you could just purchase one bag of the normal chocolate wafers and make the molds with that.  Let’s hope the teachers enjoy it!

  • Bookmark on Facebook
  • Digg This
  • Bookmark with Yahoo
  • Bookmark with Google
  • Email to a Friend
  • Print

Lottery Bouquet Basket

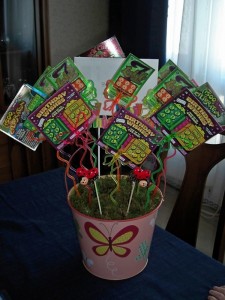
My husband’s grandmother turned 90 last week.  As part of her gift, I made her a lottery ticket bouquet basket.

Lottery Ticket Bouquet Basket

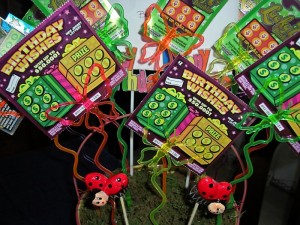
I started out with a decorative metal bucket that I found in the Easter section of Target.  I purchased a half circle of floral foam at AC Moore which I covered with craft moss.  I inserted various colored butterfly card holder picks which I purchased from an online floral supply company.  I also inserted 2 ladybug picks for added decoration (and because ladybugs stand for good luck in many cultures).  The white you see is the birthday card, in which I also included a penny from 1920, the year she was born, for the scratching of the lotto tickets.

Butterfly Floral Card Holder Picks

When I originally tossed this idea around, my thought was that I would intersperse real flowers with the lotto tickets making it a full bouquet.  However, upon seeing it finished with just the lotto tickets, we (my husband, his aunt & uncle and I) all agreed that less was more and this looked cute as it was.

You could do a much smaller version of this in a terra cotta pot!  It sure would make a great teacher gift for Teacher Appreciation week next week!

  • Bookmark on Facebook
  • Digg This
  • Bookmark with Yahoo
  • Bookmark with Google
  • Email to a Friend
  • Print

Why There Are Professionals

In August, one Monday night while I was at Weight Watchers, my husband beat down the bathroom down.  Under normal circumstances, this fact would put me in a rage like you’ve never seen before.  however, upon hearing the story, I probably would have done the same thing.  CheezWaster went to use the bathroom, locked the door, and apparently decided to lay on the floor where he proceeded to fall asleep.  After noticing that he was gone for an unusually long time, my husband went to check on him.  He called CheezWaster’s name, banged on the door, and no response.  Fearing the worst, he shouldered down the door, breaking the entire door frame in the process - only to find CheezWaster sleeping.  Needless to say, we’ve had the job of fixing the door nagging us for some time now.  Back in the winter, my husband and my father-on-law fixed the door and the molding, which I painted.  Unfortunately, I also had to remove the wallpaper in this gateway area because the people that owned the home before us wallpapered up the side of the molding.  The area is a small hallway that has doors to the basement, the guest room, our office, the bathroom and the linen closet.  While it is a small area, it has a lot of molding and a lot of odd corners.  Tonight, I did the first coat of the new paint.  It is a drastic change to the old color.  I’m excited.  I like color.  The old color was this peachy beige.  I’ve never been fond of it, but it matched the color in the wallpaper that is in various rooms on our first floor.  In doing this job, I decided a few things:

  1. There are professionals who do this sort of thing and I’m not one of them.  I’m having a bitch of a time with the line between the wall and the ceiling, despite using one of those straight edged paint thingies (yes - that is the technical term!)  There is such a different between the colors that any curvature in the line is very noticeable.
  2. I’m too damn short to paint.  If I stand on the middle rung of the ladder, I’m not high enough.  On the top rung, I’m too high and my head it touching the ceiling.
  3. I officially have used muscles I didn’t know existed in my arms.  Numerous times, I felt like I was holding the paint holder punishment style.  Both of my arms are killing me.
  4. I love my kids and I’m so glad that my husband found our son only sleeping on the floor, but this job SUCKS.
  5. I’m dreading tomorrow because I have to do the second coat.

The dark brown is the new color. To the right of the dark brown is the old color. BIG Difference!

The NEW Bathroom Door Frame

  • Bookmark on Facebook
  • Digg This
  • Bookmark with Yahoo
  • Bookmark with Google
  • Email to a Friend
  • Print

Monster Cookie Fan

So, I’m reading Cookies and Cups because - 1) she’s fabulously creative, 2) makes great stuff and 3) is a Jersey girl (like me).  Today, she came up with the brilliant idea of using Target’s Monster Trail Mix to make Monster Cookies  instead of buying everything individually.  Mmmmm…..Monster Cookies (wiping drool away from face so I can continue typing).  Alas, I did some tasty but oh so horrible for you when you are on Weight Watchers eating yesterday at a tricky tray (where I won 2 prizes - YEAH!) and I MUST be good the rest of the week in order to not have a revenge of the gruesome twosome (pounds, that is!) at weigh-in on Monday, so these will have to wait for next week.  I guess it is a good thing that 1) my husband likes the Monster Trail Mix and 2) likes to buy in bulk.  I think we have 2 of the jumbo tubs of this stuff in our cabinet.  You know how many cookies that will make?  More importantly, how many points would that be?  No - don’t tell me.  I don’t want to know.  Let me enjoy the idea of Monster Cookies for just a little longer.

  • Bookmark on Facebook
  • Digg This
  • Bookmark with Yahoo
  • Bookmark with Google
  • Email to a Friend
  • Print

Artistic Honies

  • A picture is worth 365,000 words
  • Christina Stetler Photography
  • Creative Party Place
  • Hostess With the Mostess
  • I Share Crafts
  • I Share Fun Food
  • I Share Printables
  • Kara's Party Ideas
  • One Charming Party
  • Swanky Tables

Food Honies

  • Another Lunch
  • Bake at 350
  • Bakerella
  • Baking Bites
  • Brown Eyed Baker
  • Butter Cream Barbie
  • CandyBlog
  • Cookie Madness
  • Cookies and Cups
  • Gina's Skinny recipes
  • I Share Fun Food
  • Our Best Bites
  • Picky Palate
  • Sugarplum
  • The Cookbook Junkie
  • The Decorated Cookie

Gossip Honies

  • Perez Hilton
  • Pink Is the New Blog

Health Honies

  • Does This Blog Make Us Look Fat
  • Gina's Skinny recipes
  • Never Trade What You Want the Most for What You Want in the Moment
  • She Fit

Mama Honies

  • BabyCheapskate
  • Baroque Babies
  • Blissful Kids
  • Classy Mommy
  • Cool Mom Picks
  • GoodyBlog
  • Let's Explore
  • Make & Takes
  • Making Memories
  • Mom Advice
  • Sarah and the Goon Squad
  • Super Cool Baby
  • Super Mom Central
  • Today Is Fun

Thrifty Honies

  • Deal Seeking Mom
  • Freebies4Mom
  • Kids Woot
  • Money Saving Mom
  • Money Wise Moms
  • One Kings Lane
  • Target Daily Deals
  • The Foundary by HayNeedle
  • The Mini Social
  • Thrifty Geek
  • Thrifty Mommy
  • Totsy
  • Want Not
  • Zulily
  • Teach kids to love nature and learning with Award-Winning Magazines from ShopNWF.org - just $19.95!
  • Highlights Catalog
  • Promo Offer Homepage Banner
  • GoDaddy.com Logo 120x60